Note: This feature is not available for FileZilla CLI.
What you’ll need
- An account with Amazon AWS
- An access key ID
- A secret access key.
Create a user and get a secret access key for FileZilla Pro CLI
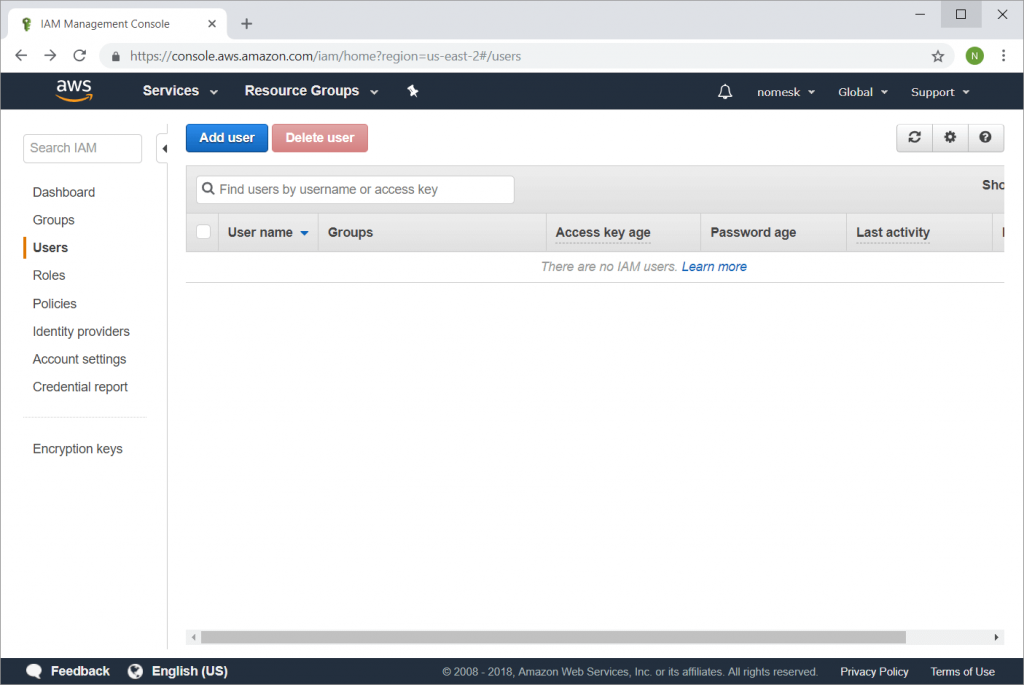
- Go to the IAM dashboard at https://console.aws.amazon.com/iam
- Select Users from the menu on the left.
- Click on Add User.
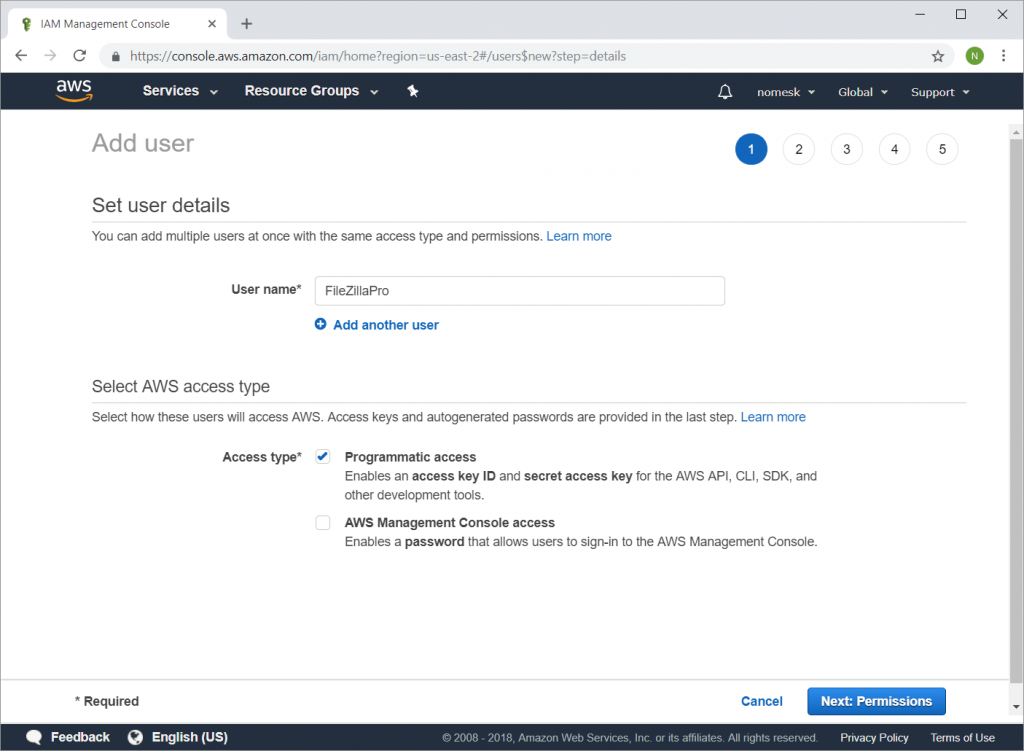
- Enter a user name.
- Tick the Programmatic access checkbox.
- Click on Next: Permissions.
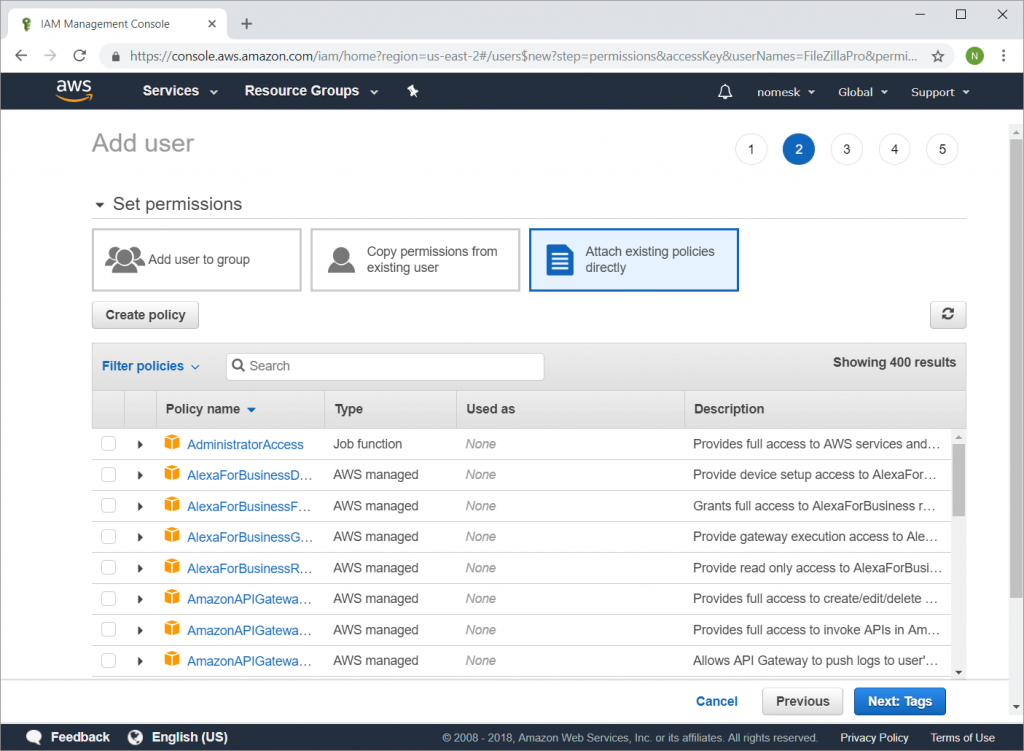
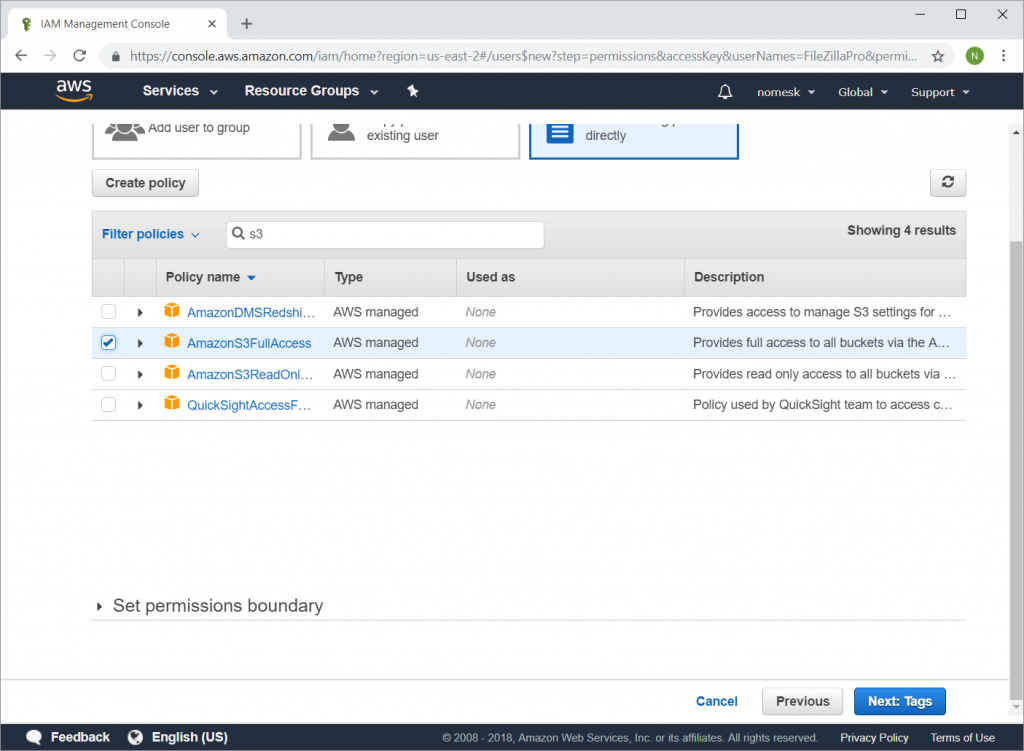
- Click on Attach existing policies directly.
- Enter S3 in the policy search field and press ENTER on your keyboard.
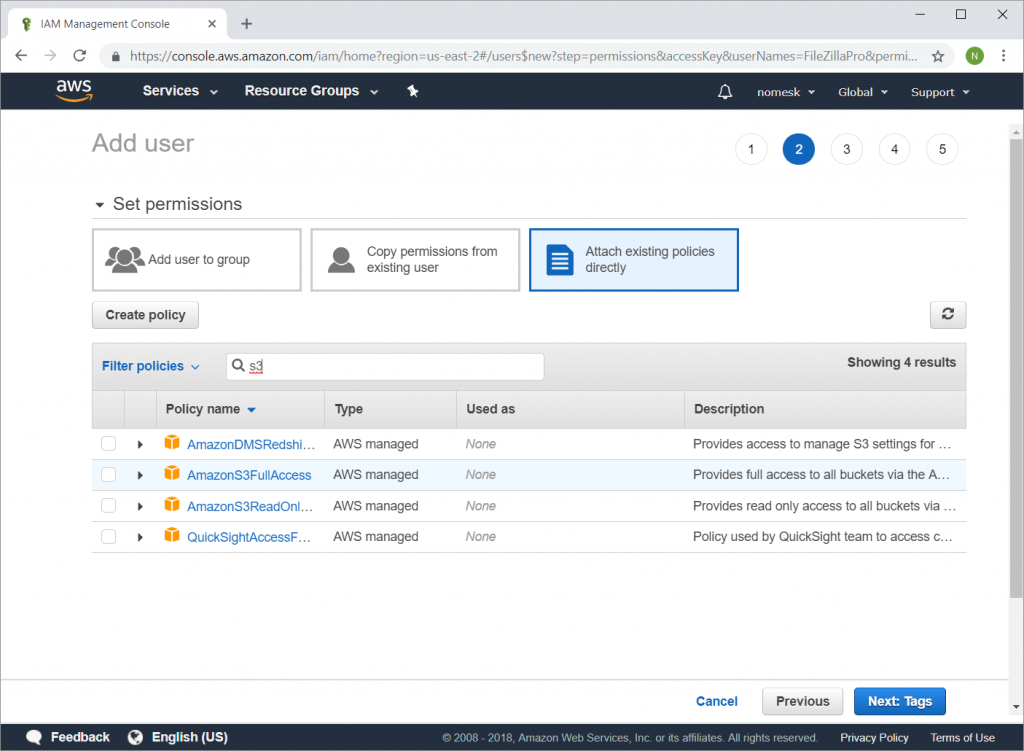
- Tick the AmazonS3FullAccess policy.
- Click on Next: Tags.
- Click on Next: Review
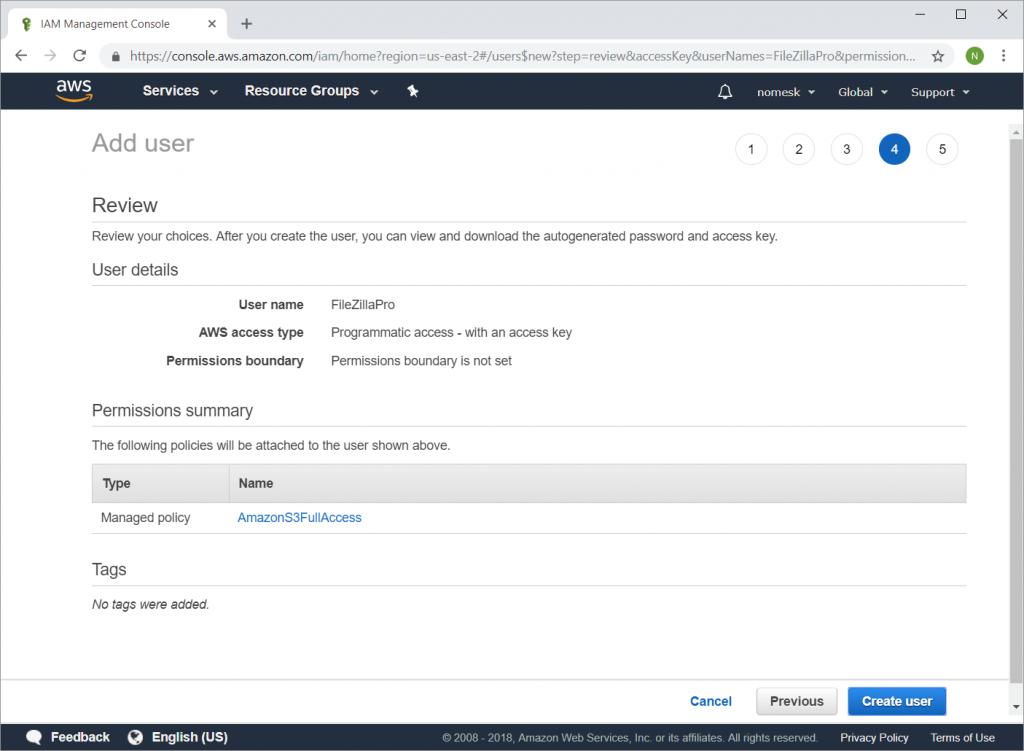
- Check that you’ve assigned the AmazonS3FullAccess policy.
- Click on Create User.
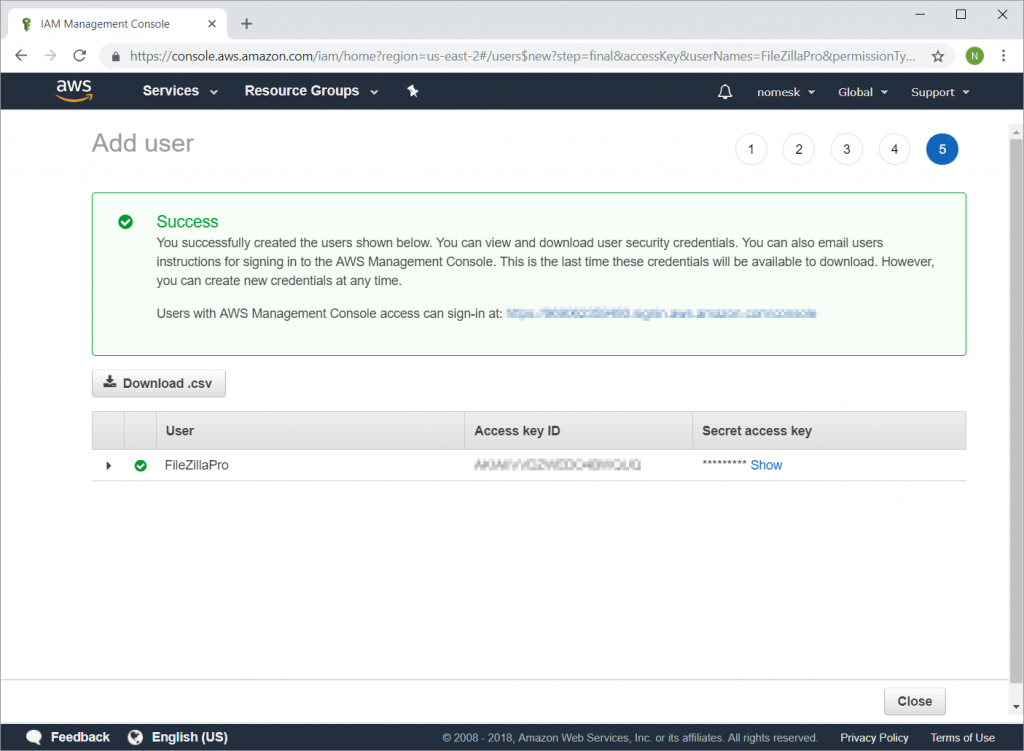
- Without closing this browser window – you’ll need the access key information – open FileZilla Pro CLI.
Connecting to S3
Use the s3 protocol and connect to the s3.amazonaws.com host:
From the prompt enter the connect command:
connect s3://<access key>:<secret key>@s3.amazonaws.com <path>
Optionally you can use the parameters of the connect command:
connect --protocol s3 --user <access key> --pass <secret key> --path s3.amazonaws.com
Note that the path is optional but if present it has to start with a slash.
How to use AWS config and credentials files to connect
FileZilla Pro Command Line can also connect using the credentials and settings from the .aws/config and .aws/credentials files.
- Use the command site add to create a new site in the Site Manager (see Using the Site Manager).
- Select S3 or S3 via IAM Identity Center protocol.
- Press enter twice to keep the default host and port.
- In the Logon type choose Profile.
- In the Profile field enter the configured profile name. For the default profile enter:
default. - Continue the site configuration.
FileZilla Pro Command Line supports the following settings:
- aws_access_key_id
- aws_secret_access_key
- region
- source_profile
- role_arns
- role_session_name
- mfa_serial
- duration_seconds
- aws_session_token
If a setting exists both in credentials and config files for the same profile the settings from the credentials file are used. If any of the settings region, role_arn and mfa_serial exist both in the site configuration and in the files, the settings from the files are used.
FileZilla Pro Command Line looks for the AWS_CONFIG_FILE environment variable to locate the config file. Also, it looks for the AWS_SHARED_CREDENTIALS_FILE environment variable to locate the credentials file.
If any of these environment variables are empty, FileZilla Pro Command Line looks for the file in the
.aws directory in the user’s (or home) directory. On Debian you can find the user’s directory with the $HOME environment variable. On Windows you can find the user’s directory with the %USERPROFILE% environment variable.
For more details about these files consult the AWS documentation.
How to authenticate against the AWS IAM Identity Center (formerlym AWS Single Sign-On)
AWS Identity Center provides access to resources without the need for access keys or secret keys.
To connect using the IAM Identity Center:
- Use the command site add to create a new site in the Site Manager (see Using the Site Manager).
- Select S3 via IAM Identity Center protocol.
- Press enter twice to keep the default host and port.
- In the Logon type choose either Interactive or Profile.
- For Interactive type, enter the AWS account ID in the Account ID prompt.
- For Profile, enter a configured profile name. The required profile fields are: sso_account_id, sso_region,sso_role_name and sso_start_url.
- Optionally, modify both the local and remote directories when prompted. See How to use AWS config and credentials files to connect.
- When asked for advanced options, enter Yes.
- In the S3 – SSO – Region prompt, enter the AWS Region that contains the AWS access portal host. This region may be different from the previously entered region.
- In the S3 – SSO – Role prompt, enter the role or permission set name.
- In the S3 – SSO – URL prompt, enter the URL for the AWS access portal.
- The site is now created. To connect use the command:
site "0/Site name" - The authentication URL will be displayed. Copy and paste it into your browser.
- In the browser, IAM Identity Center will prompt you to log in using your IAM credentials.
- After logging in, you will be asked to authorize the request.
- Click Allow to grant access to FileZilla Pro Command Line.
- Return to FileZilla Pro Command Line and press enter to continue.
You are now connected to AWS S3 using IAM Identity Center authentication. For more information, visit https://aws.amazon.com/iam/identity-center
See also: Connect to an existing site