How to Upload Files to Google Cloud

Note: Google Cloud and Google Drive are two different services.

This feature is only available on FileZilla Pro, if you didn’t buy it yet you can buy FileZilla Pro from our Store.

Below you find a step by step guide, if you prefer you can watch our How to Upload Files to Google Cloud video tutorial.

What you’ll need to upload files to Google Cloud:

  • A Google Cloud account
  • The project ID for the bucket(s) you need to access
  • An email account with permission to access the project and bucket(s)

Note: If you have multiple projects in Google Cloud that you want to access through FileZilla Pro, you’ll need to create a new site for each in the Site Manager.

Note: If FileZilla Pro is configured to save passwords protected by a master password (see Protect Passwords with a Master Password), you’ll only need to authenticate it for use with Google Cloud once; it will save the access token for future connections.

How to find your Google Cloud project ID

  1. Open an internet browser window and go to https://console.cloud.google.com.
  2. Log in as you usually would.
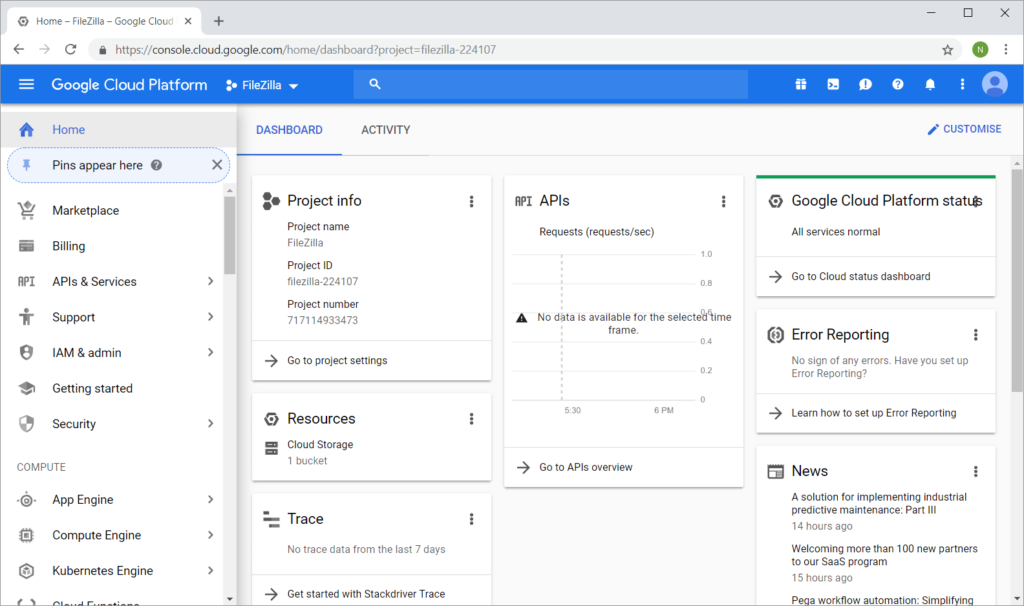
    Your Google Cloud dashboard should look something like this:
  3. The current project is listed just next to the Google Cloud Platform title:
  4. To change projects, click on the project name in the title bar and select the project you need in the pop-up window and click on Open.
  5. Check the Project info card. By default, it’s in the top left corner of the dashboard. It will list the project ID.

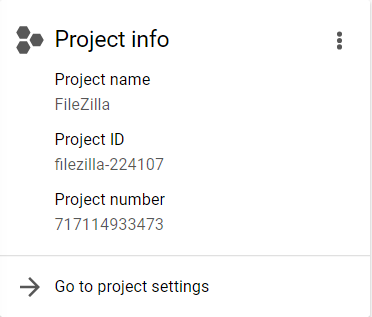
    If you can’t find the Project info card, click on the project name in the title bar. The pop-up window will list all your projects with their associated project IDs.

Configuring FileZilla Pro for Google Cloud

  1. In the menu bar, click on File › Site Manager…. See Using Site Manager for more details.
  2. Click on New Site.
  3. Select Google Cloud Storage from the Protocol drop down list.
  4. Enter your project ID in the Project ID field.
  5. Optionally enter an login as a hint for Google authentication.
  6. Click on Connect. A browser window will open to allow Google Cloud to check whether you want to allow FileZilla Pro to access your files.
  7. Click on Allow.
  8. Return to FileZilla Pro.
  9. Check the server certificate details displayed – Common name should include googleapis.com – and click on OK.
    Your Google Cloud project directories and files will be displayed in the Remote directories section of the main window.

You can now transfer files between your local machine and your Google Cloud account.

Connecting with a Service Account

To connect FileZilla Pro to Google Cloud using a service account, please follow these steps:

  1. Open the Google Cloud console and navigate to the IAM & Admin section.
  2. Select Service Accounts from the menu.
  3. Click on the service account you want to use.
  4. Go to KEYS tab.
  5. Click on the ADD KEY button and select Create new key.
  6. Select the JSON type and click on the Create button.
  7. Save the generated key file in a secure location.
  8. Open FileZilla Pro and go to the Site Manager and create a new site entry.
  9. From the Protocol drop-down list, select Google Cloud Storage with Service Account.
  10. In the Key file field, enter the full path of the saved key file or click on the Browse button to locate and select the key file.
  11. Click Connect.

Using Application Default Credentials

FileZilla Pro provides support for connecting using the Application Default Credentials.

  1. Open FileZilla Pro.
  2. In the menu bar, click on File › Site Manager….
  3. Click on New Site.
  4. From the Protocol drop-down list, select Google Cloud Storage with Service Account
  5. From the Logon Type drop-down list, select Application Default Credentials.
  6. Click Connect.

FileZilla Pro searches for credentials in the following order:

  • First, it checks the GOOGLE_APPLICATION_CREDENTIALS environment variable, which should point to a credentials JSON file.
  • If not found there, it looks for credentials from the gcloud tool, located in the following directories:

    • On Linux and macOS: $HOME/.config/gcloud/application_default_credentials.json
    • On Windows: %APPDATA%\gcloud\application_default_credentials.json

    It also checks for credentials from the Google Cloud Environment (GCE) metadata server (if
    available). The default metadata server host is metadata.google.internal on port 443. You can specify a different host or host and port with the GCE_METADATA_ROOT environment variable.

If FileZilla Pro cannot locate any valid credentials using these methods, it will display an error message.

For more details, refer to Application Default Credentials.

The video tutorial below shows how to connect to Google Cloud Storage with FileZilla Pro.

Video tutorial: How to connect to Google Cloud Storage

Tags: , , ,