Note: This feature is not available for FileZilla CLI.
Note: Google Cloud and Google Drive are two different services.
What you’ll need
- A Google Cloud account
- The project ID for the bucket(s) you need to access
- An email account with permission to access the project and bucket(s)
How to find your Google Cloud project ID
- Open an internet browser window and go to https://console.cloud.google.com.
- Log in as you usually would.
Your Google Cloud dashboard should look something like this: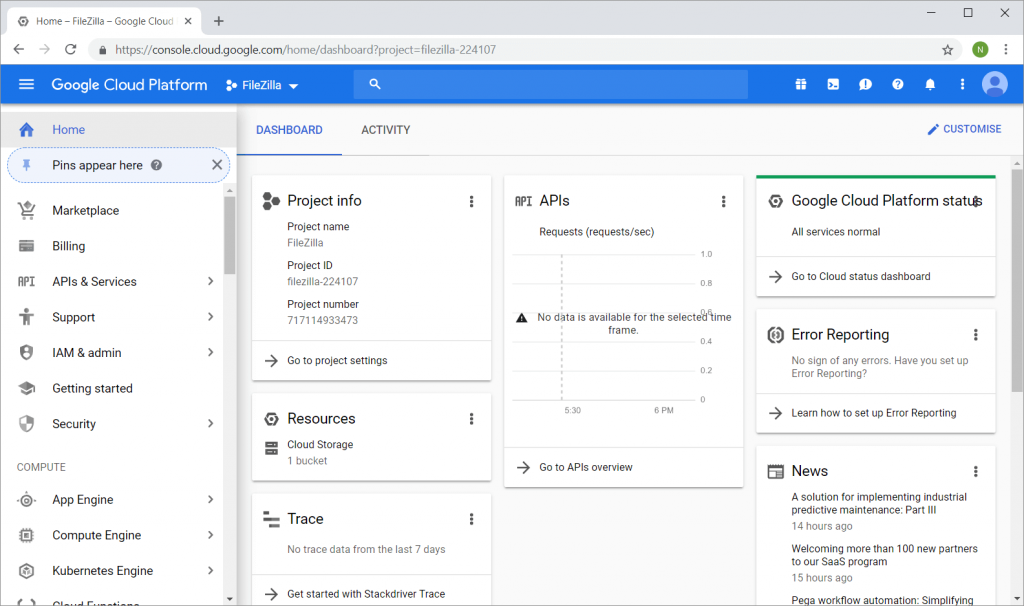
- The current project is listed just next to the Google Cloud Platform title:

- To change projects, click on the project name in the title bar and select the project you
need in the pop-up window and click on Open.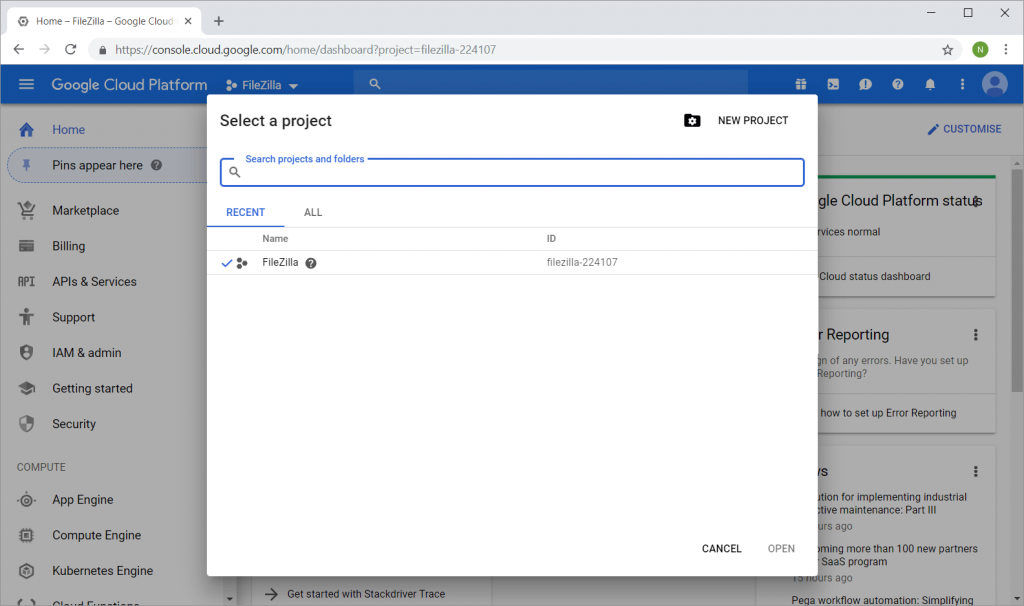
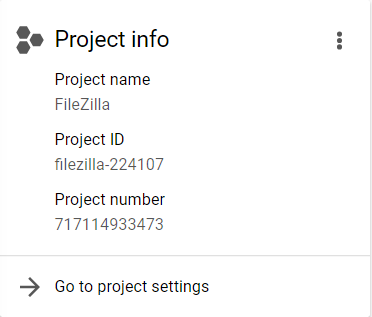
- Check the Project info card. By default, it’s in the top left corner of the dashboard. It will list the project ID.
If you can’t find the Project info card, click on the project name in the title bar. The pop-up window will list all your projects with their associated project IDs.
Connecting to Google Cloud
Use the google protocol and connect to the storage.googleapis.com host:
-
From the prompt enter the
- Open the Google Cloud console and navigate to the IAM & Admin section.
- Select Service Accounts from the menu.
- Click on the service account you want to use.
- Go to the KEYS tab.
- Click on the ADD KEY button and select Create new key.
- Select the JSON type and click on the Create button.
- Save the generated key file in a secure location.
- Launch FileZilla Pro Command Line.
- Use the command
siteadd to create a new site in the Site Manager (see Using the Site Manager). - Select Google Cloud Storage with Service Account protocol.
- Press enter twice to keep the default host and port.
- In the Logon type prompt, select Key file.
- In the Key file field, enter the full path of the saved key file.
- Continue configuring the site following the prompts.
- Launch FileZilla Pro Command Line.
- Use the command site add to create a new site in the Site Manager (see Using the Site Manager).
- Select Google Cloud Storage with Service Account protocol.
- Press enter twice to keep the default host and port.
- In the Logon type prompt, select Application Default Credentials
- Continue configuring the site following the prompts.
- First, it checks the GOOGLE_APPLICATION_CREDENTIALS environment variable, which
should point to a credentials JSON file. - If not found there, it looks for credentials from the gcloud tool, located in the following directory:
– %APPDATA%\gcloud\application_default_credentials.json - It also checks for credentials from the Google Cloud Environment (GCE) metadata server (if
available). The default metadata server host ismetadata.google.internalon port 443. You
can specify a different host or host and port with the GCE_METADATA_ROOT environment
variable.
connect command:
connect google://project-id@storage.googleapis.com<path>
Optionally you can use the parameters of the connect command:
connect --protocol google --user <project-id> --path <path>storage.googleapis.com
Note that the path is optional but if present it has to start with a slash.
Google mandates that you acknowledge reading FileZilla Pro Command Line’s statement regarding adherence to Google API Services User Data Policy.

Enter yes to accept and, in the prompt Show this information again? enter no to prevent the same message from appearing in the future.
An authorization URL is shown. Open the authorization URL in a browser and follow the steps to authorize FileZilla Pro Command Line.
You can now transfer files between your local machine and your Google Cloud account.
Connecting with a Service Account
To connect FileZilla Pro Command Line to Google Cloud using a service account, follow these steps:
Using Application Default Credentials:
FileZilla Pro Command Line provides support for connecting using the Application Default Credentials.
FileZilla Pro Command Line searches for credentials in the following order:
If FileZilla Pro Command Line cannot locate any valid credentials using these methods, it will display an error message.
For more details, refer to Application Default Credentials.
See also: Connect to an existing site.