Below you find a step by step guide, if you prefer you can watch our File Synchronization video tutorial.
Use synchronization to compare and synchronize files and directories between your local computer and the remote server:
- In the main menu choose Transfer > File Synchronization. The options window is
displayed: - Enter both the local and remote directories that will be synchronized.
- Select the synchronization type:
- Local to remote: local files not on the server are uploaded, files on the server
but not on the local directory are removed from the server, files existing on both
sides are uploaded depending on the Same File option. - Remote to local: remote files not on the local directory are downloaded, files
on local system but on the server are removed locally, files are existing on both
sides are downloaded depending on the Same File option. - Bidirectional: local files not on the server are uploaded, remote files not on the
local directory are downloaded, no files are deleted. - Select the criteria to handle files that exist on both sides:
- Ignore: just ignore the files.
- Transfer if newer: upload or download if the source (local or remote) is newer
than the target (remote or local). - Transfer if sizes are different: upload or download if file sizes are different. It is ignored in the Bidirectional type. With FTP family protocols it works only for non
ASCII files according to the configuration. See Configure File Type Classifications for FTP and FTPS. - Tick Recursive if you want to recursively synchronize files and subdirectories. If not set FileZilla/FileZilla Pro only synchronizes files on the root directories.
- Tick Preview if you want to have a preview of the synchronization changes. If not set:
the synchronization starts immediately. - The option Apply filter is available if you have filters enabled (see Filter Files and Directories).
Tick this option to apply the current enabled filters to the synchronization.
The same local and remote filters must be enabled. - Click Start to begin the synchronization.
- After start you can click Stop to stop the synchronization. If the Preview option is not set some transfers may have been already started. If Preview option is set a window is displayed with a list of the changes:

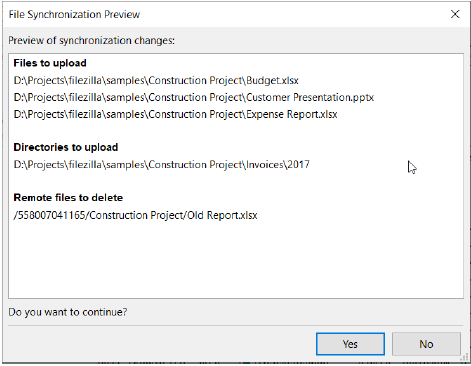
Choose Yes and the actions take place, or No to close without changes.
The video tutorial below shows how to synchronize your local files and directories with the remote server with FileZilla Pro.