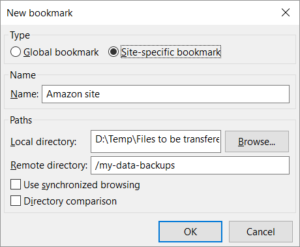
Below you find a step by step guide, if you prefer you can watch our Bookmark a Directory video tutorial.
You can make it easier to reach frequently-used directories by creating bookmarks. A bookmark holds information for both a local and remote directory, and your directory navigation preferences. There are two types of bookmarks:
- Global bookmarks can be used on multiple sites. Use these if you connect to a number of remote sites with the same directory structure where you want to put a bookmark. It’s essentially a relative path.
- Site-specific bookmarks are used on one site only.
Note: Bookmarks contain information about the location, but they don’t contain connection
information like server address and login credentials. Connection information is stored in the Site Manager. To use a bookmark, first connect to a remote site, then select the bookmark.
To create a bookmark:
- Open a connection and navigate to the local and remote directories that you want to
save in a bookmark. - In the main menu, click on Bookmarks > Add bookmark…. Alternatively, press CTRL-B.
- Select either Global bookmark or Site-specific bookmark from the Type option group.
- Enter a name for the bookmark. This will be displayed in the Bookmark menu.
- Check the Local directory field. If you want to change it, enter a local directory or click Browse… to navigate to the desired local directory.
- Check the Remote directory field. Note that it doesn’t contain all server and drive information; just the directory path post-connection. Modify if needed, but be careful to keep the same format.
- To automatically enable synchronized browsing when you select this bookmark (see
Synchronizing browsing of local and remote directories), tick the Use synchronized browsing checkbox. - To automatically enable directory comparison when you select this bookmark (see
Comparing local and remote files), tick the Directory comparison checkbox. - Click on OK.
To use a bookmark:
- Open a connection to the remote server.
- In the main menu, click on Bookmarks and the name of the bookmark you want to use.
The video tutorial below shows how to use Bookmarks.
