S3 files can have metadata and tags associated with them. Both are pairs of names and values that describe a file. FileZilla Pro lets you configure default metadata and tags that are applied automatically when you upload files to an S3 site.
Configure default metadata and tags
- Connect to your S3 site.
- In the main menu, choose Transfer › S3 Options › Default Metadata and Tags…
- The Default S3 Metadata and Tags dialog is shown.
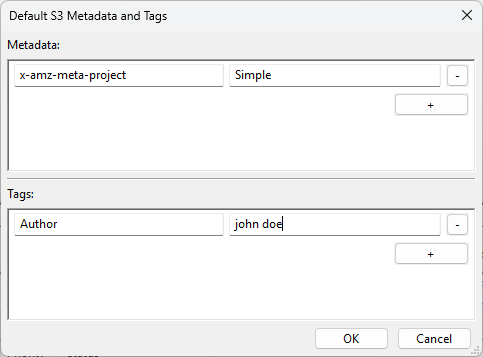
- In the Metadata box, click + to add a metadata entry. Enter the metadata name in the left field and its value in the right field. For custom metadata, keep the
x-amz-meta-prefix and enter the name after it. - In the Tags box, click + to add a tag. Enter the tag name in the left field and its value in the right field. Tags do not use the
x-amz-meta-prefix. - Repeat these steps to add more metadata entries or tags. You can configure metadata only, tags only, or both.
- Click OK to save the defaults, or Cancel to close the dialog without saving your changes.
Example
The following configuration adds a custom metadata entry and a tag to every newly queued upload:
- Metadata:
x-amz-meta-project=Simple - Tag:
Author=john doe
Edit or remove defaults
- Change an entry: open the dialog again and edit its name or value.
- Remove an entry: click the – button beside it, then click OK.
- Stop adding defaults: remove all entries from both boxes and click OK. Newly queued files will no longer receive default metadata or tags.
Good to know
- Each entry must have a name. Entries with an empty name are ignored when saving.
- A value can be empty.
- Use a different name for each metadata entry, and a different name for each tag.
To set metadata or tags on files that are already on the S3 site, use the S3 Properties dialog instead. In that dialog, the Permissions, Metadata and Tags boxes overwrite existing values.