Below you find a step by step guide, if you prefer you can watch our How to Share Files with Microsoft OneDrive video tutorial.
To share a file or a directory you have to send a sharing invitation to the recipients.
To send the sharing invitation:
- Select the files and directories you want to share.
- Right-click and choose Share. The share window will be displayed with the existing permissions:
- Click the + button to add a share permission
- Enter one or more recipients’ emails
- Select the role:
edit – the recipient can edit
view – the recipient can only view - You can enter a custom email message, OneDrive will include it in the invitation email. The invitation email is sent when a new permission is added or when the role of an existing permission is modified.
- Check Requires sign-in to specify the recipient of the invitation is required to sign-in to access the shared item. OneDrive may return an error if the recipient is not an OneDrive user.
- If you want to remove an existing permission click the – button.
- You can change the existing permission grantee or role.
- Click OK to apply the changes to the permissions.
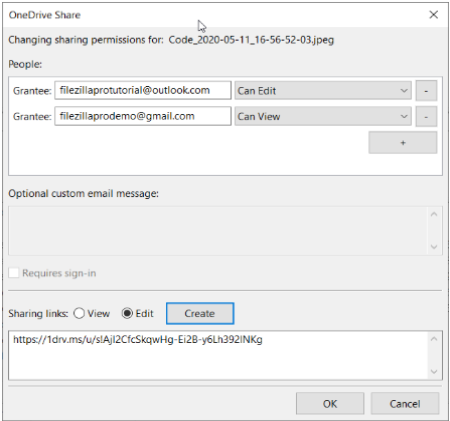
You can also create a sharing link for the selected items. Anyone with the link can either view or edit the item depending on the link type:
- Select the sharing link type:
- view: creates a read-only link to the item
- edit: creates a read-write link to the item
- Click Create. The links are shown in the list below.
The video tutorial below shows how to share files with Microsoft OneDrive.
FileZilla Pro
Microsoft OneDrive is just the start
FileZilla Pro connects to all major cloud storage providers from a single interface — no extra software, no credential juggling. Transfer files between your local machine and the cloud exactly as you would over FTP.
Amazon S3
Google Drive
Microsoft Azure
WebDAV
Dropbox
OneDrive